Friday, June 29, 2012

Very Berry Cheesecake


Tall One's dear friend Scott is a Navy Supply Corps officer and today, July 2, he is being promoted from Lieutenant Junior Grade to full Lieutenant. He is very dedicated to serving our country and very deserving of this promotion. Since we are Spatularettes, we clearly decided that the only proper way to celebrate was with a cake! And what could be more patriotic than this Very Berry Cheesecake!


The timing of Scott's promotion couldn't be better because this cheesecake recipe is also PERFECT for the 4th of July! We decorated Scott's cake with his name and the signature Navy Supply Corps oak leaf. The other cakes were adorned with fresh berries and patriotic slogans. Neither of The Spatularettes are artists, by any stretch of the imagination, so we couldn't have been happier with the adorable finished products! The cheesecake itself is silky smooth, packed with flavor, and received nothing but rave reviews! When you get the chance, check out this great cheesecake recipe from Gimme Some Oven that inspired us!


INGREDIENTS:

CRUST:
-1 1/4 cup chocolate graham cracker crumbs
-1/4 cup sugar
-1/4 cup butter, melted

FILLING:
-3 blocks of cream cheese (8 oz each)
-1 1/4 cups sour cream
-3/4 cup sugar
-3 eggs
-1 cup berry puree

OPTIONAL:
-Whipped cream
-Chocolate
-Fresh berries

**Note: we think this works best when we let the ingredients come to room temperature before baking.


Preheat the oven to 350 degrees and start by preparing your springform pans by spraying them evenly with cooking spray. This recipe will make one 9 inch pan, two 6 inch pans, or seven mini 4 inch pans. The first time we made this we did the full size, but for this occasion we used the 6 inch and 4 inch pans. All 3 styles turned out fabulously!

For the crust, process 1 package of chocolate graham crackers in the food processor to create fine crumbs. This will give you about 1 1/4 cups, just measure them out to be sure. In a medium bowl, combine the chocolate graham cracker crumbs, the sugar and the melted butter. Use a wooden spoon (or your hands) to mix until well combined. Press the crust into the bottom of the spring form pans and bake for 6 minutes. Set the pans aside.

To make the berry puree, simply add about a cup and a half of cleaned and trimmed fresh berries to a food processor. Let it run for about a minute, stopping occasionally to scrape down the sides, or until a relatively smooth puree forms. We've only made this cheesecake with strawberries and blueberries, but we imagine that any berry combo would work well. Measure out a cup of puree and set aside.

For the filling, beat 3 blocks of cream cheese in a stand mixer until light and fluffy. Add the the sour cream and continue mixing, just until combined. You'll need to use a spatula to scrape down the sides of the bowl at least once. Next, add the sugar and mix on low speed for about another minute. Once the sugar has been incorporated, add the eggs one at a time, beating them into the mixture after each addition. Finally add 1 cup of berry puree and mix, just until evenly combined.

Pour the filling over the prepared crusts and bake on the middle rack in a 350 degree oven. To minimize cracking, fill a glass 9x13 dish with water and place it on the bottom rack, below the cheesecake. Once the cake is nearly finished (the edges will be well set but the center will be ever so slightly jiggly), turn off the heat in the oven and prop the door open allowing the cake to rest as the oven cools. Baking and resting times vary depending on cake size so check the table below. Once finished, remove the cake from the oven and allow it to cool on a wire rack in the springform pan for another 10 minutes. Remove the sides of the springform and let it finish cooling to room temperature. Refrigerate for 8 hours before serving.

BAKING TIMES:
BAKE REST
9 inch pan 50-55 min 30 min
6 inch pan 40-45 min 20-25 min
4 inch pan 30-35 min 15-20 min

**Note: You definitely don't want to over-bake your cheesecake. You may be questioning if it is completely done when you remove it from the oven, but no need to worry. The cheesecake will continue to set up as it cools. If you follow the baking times above, you will have the PERFECT cheesecake!


There are lots of different ways to decorate a Very Berry Cheesecake so use your imagination! We started by topping each of our cakes with a thin layer of homemade whipped cream. If you do, unfortunately, end up with some cracks in your cakes, this is an easy and pretty way to cover them right up. For the detailed chocolate work, we melted dark chocolate Hershey Kisses with a Tbs of vegetable shortening on the stove top. Once the chocolate was smooth and melted, we turned off the heat and let it cool to room temperature. Then, using a disposable frosting bag and the #1 Wilton tip (a very fine round) we carefully piped the chocolate onto the cakes. Other than that, we just got creative with berries! The options are endless and the decorating is the most fun part!


Celebrate America, freedom, or your favorite member of the armed forces with Very Berry Cheesecake!

XOXO,
Tall and Small

Taco Dip


The first of July! Seriously!?! Where is this summer going? It feels like it was JUST memorial day! Now that July is upon us we realized it is time to start giving some thought to what we are going to serve at our respective 4th of July picnics this year. In our opinion, no summer picnic is complete without a taco dip. There are loads of different options when it comes to taco dip, but we decided to switch this one up from the norm a little bit and start with a spicy black bean base instead of your traditional refried beans It is a surprisingly little kick that we think you will love! The whole dip can be put together in about 20 minutes, so it is perfect if you are on the go this holiday.


INGREDIENTS:

-1 can black beans
-3 Tbs chopped green chilles (from a can)
-1/2 cup whipped cream cheese
-1/4 cup sour cream
-1/2 tsp chili powder
-1/2 tsp cumin
-sprinkle of cayenne pepper
-2 avocados
-1 lime
-1 cup shredded cheese
-1 cup shredded lettuce
-1 tomato, chopped
-1/2 small red onion, chopped
-Tortilla chips


Layer 1:
Drain and rinse a 16 oz can of black beans. Pour them into a medium bowl and mash with the back of a wooden spoon. Add 3 Tbs of chopped green chilles and continue to mash. Add a little bit of salt if needed. Spread the bean mixture thinly onto a serving platter.

Layer 2:
Measure 1/2 cup of whipped cream cheese and 1/4 cup of sour cream into a bowl and mix until well combined. Add 1/2 tsp of chili powder, 1/2 tsp of cumin, a sprinkle so cayenne, and a little salt if needed. Mix until spices are evenly distributed. Spread the mixture thinly over the black bean layer.

Layer 3:

In another bowl mash 2 avocados, the juice of 1 lime, and a little bit of salt. Spread the mashed avocados over the white layer on the serving platter.

Layer 4:

Top avocado with 1 cup shredded cheese.

Layer 5:

Top cheese with a layer of lettuce, chopped tomato, and chopped onion.


Serve with tortilla chips and you'll be the STAR of any picnic this 4th of July!

XOXO,
Tall and Small

Thursday, June 28, 2012

Farmer's Market Tortellini Salad


This has been SUCH a busy summer for The Spatularettes!  It has been jam packed with vacations, weddings, work trips and apartment hunting... and things are just heating up!  Last weekend Small One was out of town (once again!) but Tall One was finally able to enjoy a relaxing weekend at home.  It was a wonderful few days full of reading out on her roof, drinks by the river with friends, and strolling through the Manayunk Arts Fest.  To make things feel extra summery, she even made time to stop by her favorite farmer's market in Chestnut Hill after church on Sunday.  There were so many bushels of fresh and local produce that she couldn't decide what to buy!  Instead she brought home a little bit of everything and made an impromptu lunch that was too good not to share!


INGREDIENTS:

-1 lb package frozen tortellini
-1 red tomato
-1 yellow tomato
-Handful of fresh green beans
-1 orange pepper
-2 ears of corn
-1/4 cup of fresh oregano
-1/4 cup of olive oil
-sea salt


Roast 2 ears of corn in the oven at 400 degrees for 20 minutes.  Leave the husks on, place them on a baking sheet, and throw in the oven.  It is that simple.  They will start to smell sweet and corny when they are done.  Remove from the oven and allow to cool in the husk for about 10 minutes.  Remove the husk and use a large knife to cut the kernels from the cob.

While the corn is cooking, boil water in a 2 quart pot.  Meanwhile, trim the fresh green beans into bit sized pieces.  Once the water is boiling add the tortellini and cook for about 5 minutes.  Add the beans to the water for the last minute of cooking.  Drain the tortellini and the beans together in a colander and set aside to cool a little bit.


While the corn is cooking and the pasta is boiling, dice the tomatoes and peppers and add them to a large bowl.  Chop the oregano and add to the bowl as well.  When they are finished, add the corn, pasta, and beans to the bowl.  Top everything with 1/4 cup of olive oil and gently toss to evenly coat the ingredients.  Finally add sea salt to taste.


Be creative and use your favorite farmer's market veggies and herbs!

XOXO,
Tall and Small

Sunday, June 24, 2012

White Chocolate Peppermint Trifle


Remember a few days ago when we posted the recipe for One Bowl Chocolate Cake and we told you it was very important to line the baking pan with parchment paper?

Last month Tall One was baking a cake for her friend Scott's birthday... or was it Steve's birthday? (We told you there have been A LOT of birthdays lately!) Anyways, while baking, she realized she was out of parchment paper but was feeling too lazy to run up the street and buy some more. As a result, when she flipped the cakes out of the pan, half of the cake stayed behind! Seriously, people! Parchment paper works wonders!!

Not wanting to waste 2 perfectly good cakes, she decided to improvise a bit and came up with this INCREDIBLE White Chocolate Peppermint Trifle. The cake was no longer usable for layering, but it was perfect to cube up and layer with creamy mousse for a super decadent dessert. The white chocolate mousse was inspired by the one and only Betty Crocker and boy does she know what she is doing with this recipe!


INGREDIENTS:

WHITE CHOCOLATE PEPPERMINT MOUSSE
-4 egg yolks
-1/4 cup sugar
-1 cup heavy cream
-1 cup white baking chips
-1 1/2 cups heavy cream
-2 tsp peppermint extract
-Green food coloring

-8 oz of whipped topping

Optional:
Mini chocolate chips


Start by baking the chocolate cake recipe of your choice. Let it cool then cut it into bit sized pieces and set aside.

For the mousse, place the egg yokes in the bowl of a stand mixer fit with the whisk attachment and beat on high speed for about 3 minutes. The eggs will thicken and lighten in color. Gradually add the sugar and beat for another minute.

Meanwhile, heat the 1 cup heavy cream over low heat in a medium saucepan on the stove top until it is very hot. Just before the cream reaches a simmer, remove it from the heat. Gradually stir at least half of the cream into the egg yokes in order to temper the mixture. If you add it all at once, the eggs will scramble from the heat. We think the best technique to temper eggs, is to slowly run the hot cream down the side of the bowl containing the eggs. This gives it a chance to cool slightly before hitting the eggs. It is also important to continuing stirring the mixture as you add the cream.


Once the eggs have been tempered, return the entire mixture (eggs, sugar, and cream) to the saucepan and cook over low heat for about 5 minutes (it may take a little longer) until the mixture thickens. Stir the mixture constantly while over the heat to avoid sticking or boiling. Add the white chocolate and peppermint extract and continue stirring, just until the chocolate has melted into the mixture. Transfer to a medium bowl and refrigerate for 2 hours, stirring occasionally. The mixture will continue to thicken in the refrigerator forming a custard.

Remove the custard from the refrigerator and add about 30 drops of green food coloring, stirring until the color of the custard is consistent. In the bowl of a stand mixer fit with the whisk attachment, beat 1 1/2 cups of cream on high speed until stiff peaks form. Fold the custard into the whipped cream, gently mixing to form the white chocolate peppermint mousse. Refrigerate until you are ready to assemble the trifle.


Use a large clear serving bowl to assemble the trifle since you'll want to show off all of those pretty layers! Layer a third of the cubed cake in the bottom of the dish and top it with half of the mousse. Add another layer of cake followed by another layer of mousse. Top the mousse with the remaining cake. Finish the trifle off with a layer of whipped topping and a sprinkle of mini chocolate chips.


This will get the stamp of approval from hungry Spatulars (and Spatularettes!!) everywhere!

XOXO,
Tall and Small

Strawberry Filled Chocolate Cake


Every year when summer rolls around again, we just cannot get enough fresh fruit!  Each trip to the grocery store, the farmers market, or just the corner store, seems to result in one of us lugging a heavy bag of produce home.  As much as we are loving the fresh peaches, plums and blueberries this year, the strawberries have really captured out hearts... and our taste buds!   We can't seem to find enough ways to use them!  We've topped our cereal in the morning, we've added them to salads for lunch, we've dipped them in sour cream and brown sugar for a heavenly snack, and now we've made THIS strawberry cake filling!  We altered the recipe for Berry Bavarian Cream that we found in Tall One's Joy of Cooking cookbook.  The fresh strawberry taste really shines through and perfectly compliments the richness of the chocolate.  One of our spatular friends even requested that we make him a bowl of strawberry cream to eat on its own!


INGREDIENTS:

STRAWBERRY FILLING
-1 cup strawberries, hulled and halved
-1/4 cup sugar
-2 Tbs cold water
-2 tsp gelatin
-2 Tbs boiling water
-1/2 cup heavy cream

CHOCOLATE BUTTERCREAM
-2 sticks butter
-3/4 cup cocoa
-1 tsp vanilla
-2 Tbs cream
-3 1/2 cups powdered sugar


Start by making your favorite chocolate layer cake (we suggest our One Bowl Chocolate Cake) and letting it cool completely.

To make the strawberry filling, hull and half 1 cup of fresh strawberries and puree them in the food processor until smooth.  Add 1/4 cup of sugar to the strawberries and set aside for about a half an hour.  In a small bowl, add 2 tsp of unflavored gelatin powder to 2 Tbs of cool water.  Let it sit for a couple of minutes to soften the gelatin.  Next add 2 Tbs of boiling water to the bowl and stir quickly with a fork to dissolve the gelatin.  Combine the strawberry puree and the gelatin mixture in a medium bowl and refrigerate for about 15 minutes, or until the strawberries start to set up.

Meanwhile, whip a half cup of heavy cream on high speed with the whisk attachment of your stand mixer until stiff peaks form.  Set the cream aside.  Remove the strawberries from the refrigerator.  At this point they should resemble a thin jam.  Use a spoon to mix the strawberries and break up any lumps.  Gently fold the whipped cream into the strawberries, mixing until they are uniformly distributed.  Return the strawberry cream to the refrigerator for at least 2 hours, or until it has set into a thick filling.


While the filling is in the refrigerator, go ahead and make the chocolate butter cream.  Use the paddle attachment on your stand mixer to cream 2 sticks of butter until light and fluffy.  Slowly mix in the cocoa, vanilla, and cream, then crank up the speed and beat for a little bit longer.  Finally, add the powdered sugar, a half cup at a time, mixing after each addition until the desired consistency is reached.

When assembling the cake, start by topping one of the cooled layers with the strawberry filling.  Try and leave about a half inch border of cake around the filling so it doesn't ooze out the sides when topped with the other layer. (Learn from our mistakes!)  Frost with the cake with the chocolate butter cream and decorate with fresh strawberries!


Chocolate and strawberries are a girl's best friend :)

XOXO,
Tall and Small

Saturday, June 23, 2012

Cookie Dough Chocolate Cake


Cookie Dough Chocolate Cake.  This is definitely NOT your mama's chocolate cake recipe!

Is it just us, or does it seem like A LOT of people have early summer birthdays?  We've had a whole slew of friends celebrate the turning of another year over the last month, and as Spatularettes we feel that it is our job to provide the cake for said celebrations.  To keep things simple, we decided to make One Bowl Chocolate Cake and just dress it up different ways.

In case you haven't tried it yet, adding cooking dough to any dessert is a sure fire way to make it a hit.  We found the recipe for eggless cookie dough filling on Pinterest which led us to Sweet Anna's blog.  You can also just make your favorite chocolate chip cookie dough and leave out the eggs!  Since the cake is rich and the filling is sweet, we decided to mellow out the frosting a bit and use Smitten Kitchen's sour cream chocolate frosting.  The sour cream frosting didn't seem sweet enough on it's own, but when paired with the cake and the filling, turned out to be the perfect balance of flavors.  Try it, we think you'll love it!


INGREDIENTS:

COOKIE DOUGH FILLING
-1/2  cup butter, softened
-1/2 cup firmly packed brown sugar
-1/2 cup sugar
-2 Tbs milk
-1 tsp pure vanilla extract
-1 cup flour
-1 cup mini chocolate chips

SOUR CREAM FROSTING
-13 oz bag of chocolate chips (dark or semi sweet)
-16 oz container of sour cream, at room temperature
-1/2 cup light corn syrup
-3/4 teaspoon vanilla extract


Start by baking your favorite chocolate layer cake.  We suggest our One Bowl Chocolate Cake.  Let the layers cool completely before assembling the cake.

For the cooking dough filling, beat the butter in the bowl of a stand mixer until light and fluffy.  Add both sugars and continue to beat for another minute.  Combine the milk and the vanilla in a liquid measuring cup and alternating adding the liquids and the flour while mixing on low speed.  Once the dough has formed, fold in the mini chocolate chips with a spatula.  We suggest leaving the cookie dough at room temperature until you are ready to assemble.

For the frosting, start by melting the chocolate, either on the stove top or in the microwave.  Once the chocolate is melted, remove it from the heat and allow it to cool until it is tepid.  In a separate bowl, whisk together the sour cream, corn syrup and vanilla.  Slowly add in the cooled chocolate, stirring quickly until the ingredients combine evenly and form the frosting.  Refrigerate until you are ready to frost the cake.  The consistency of the frosting is that of a thick pudding, which makes it very easy to spread.  Just make sure you keep it chilled so as not to end up with a runny mess!

To assemble the cake, place one layer on a serving plate and top with the majority of the room temperature cookie dough.  It is very thick, but should spread relatively easily.  Top with the other layer, and use the remaining cookie dough to fill in any gaps around the edges.  Finally, frost the cake with a thin layer of chocolate frosting and decorate with mini chocolate chips or the embellishment of your choice!


This might not be your mama's chocolate cake, but we promise she will love it too!

XOXO,
Tall and Small


Friday, June 22, 2012

One Bowl Chocolate Cake


Welcome to  "Not Your Mama's Chocolate Cake" week on The Spatularettes!  Over the next few days we are going to show you some fabulous ways to jazz up a standard chocolate cake and turn it into something really special.  Ironically though, we are going to start off with Tall One's Mama's chocolate cake recipe.  She made this every year for Tall One's birthday and we're pretty sure the recipe came from the back of a Hershey's cocoa container.  This cake is rich, moist, and only requires one bowl, so what's not to love!

INGREDIENTS:
-1 3/4 cups flour
-2 cups sugar
-3/4 cup cocoa
-1 1/2 tsp. baking soda
-1 1/2 tsp. baking powder
-2 tsp. vanilla
-1 tsp. salt
-2 eggs
-1 cup milk
-1/2 cup oil
-1 cup boiling water


Preheat oven to 350 degrees.  Prepare either two 9 inch baking rounds, three 8 inch baking rounds, or one 9x13 pan.  This cake is a bit sticky when it finishes baking so it is important to grease and flour the pans, as well as line the bottom with parchment paper.

In the bowl of a stand mixer, combine all of the dry ingredients and mix on low speed until well combined.  Add all of the remaining ingredients, except the boiling water and beat for two minutes.  Finally stir in the 1 cup of boiling water.  The batter will be very thin, but that is how it is supposed to be.

Pour the batter into the prepared baking pans and bake for 30-35minutes for layers or 35-40 minutes for the 9x13 pan or until cake tester comes out clean.  
When the cakes have finished baking, let them cool on a wire rack for 10 minutes.  To removed them from the pans, gently run a knife along the perimeter, then flip them onto the wire rack to finish cooling.  If you used the parchment paper, they will come out without a hitch.  If you don't use the parchment paper, you might have to improvise a bit (more on that later).


Frost the cakes with your favorite frosting, or log back on over the next few days and check out our suggestions on how to turn this basic recipe into "not your mama's chocolate cake!"


XOXO,
Tall and Small


Wednesday, June 20, 2012

Shallot Toasts


Here is another recipe that is almost too easy to post, but it is simple and wonderful, and pairs perfectly with yesterday's salad.  So we figured, what the heck, everyone is looking for the easy way out from time to time.  The funny thing about these Shallot Toasts though, is that they sure don't taste like the easy way out!


INGREDIENTS:
-6 half inch slices of Italian bread
-1 Tbs butter, melted
-Garlic powder
-Kosher salt
-1 shallot, minced

Seriously friends, this is about as easy as it gets!  Preheat the over to 350 degrees.  While the oven is heating, slice the bread.  Brush each slice generously with melted butter.  Sprinkle with garlic powder and kosher salt (it is up to you how much you like!).  Finally, top the toasts with the minced shallot.  Bake the bread for about 15 minutes or until it gets crispy and the shallots get soft.  The flavors come together beautifully, making these toasts the perfect accompaniment to any summer salad!


Sometimes we just like things to be simple!

XOXO,
Tall and Small

Tuesday, June 19, 2012

Salmon Chopped Salad with Homemade Honey Mustard


Holy cow, there is a HEAT WAVE heading our way!!  Over the next few days, Philadelphia is about to get hit with temperatures around 100 degrees for the first time this summer.  We don't know about you, but when it is that hot outside, the last thing we want to be doing is cranking up the heat in the kitchen.  So here is a super simple idea to help keep you cool and satisfied the next time you get hit with a scorcher of a day!


INGREDIENTS:
Salad:
-1/4 head of lettuce, chopped
-2 Tbs chopped tomato
-2 Tbs chopped onion
-2 Tbs chopped cucumber
-2 Tbs chopped red pepper
-2 Tbs feta cheese crumbles
-1 hard boiled egg, chopped
-3 oz grilled salmon

Honey Mustard Dressing:
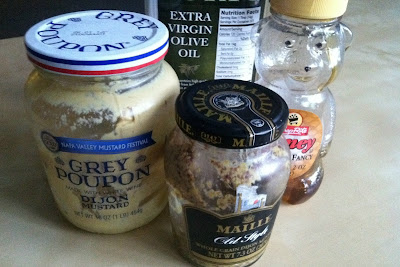
-1 Tbs Dijon mustard
-1 Tbs whole grain mustard
-1 Tbs honey
-1/4 cup olive oil


The salad is almost too easy to explain.  Lay a bed of lettuce and top with the chopped ingredients, each in their own little section.  We used the ingredients listed above but feel free to sub in your favorite veggies.  To make it a little more hearty for dinnertime, we suggest topping it with grilled salmon, but chicken or steak would also be great!

To make the dressing, use a fork to whisk together 1 Tbs of Dijon mustard, 1 Tbs of whole grain mustard, and 1 Tbs of honey.  Once they are well combined, slowly drizzle in the olive oil and continue to whisk until a smooth dressing forms.


STAY COOL!!

XOXO,
Tall and Small

Monday, June 18, 2012

Giada's Citrus Pasta Salad


The Spatularettes love everything about summer: the long days, the warm weather, the endless number of outdoor activities, the fresh ingredients, and trips to the shore!  Tall One just got back to town from her annual girls weekend in Sea Isle City and Small One is currently enjoying a lovely week in the Outer Banks.  We think the only thing that says summer more than a week of lounging in the sand, is this Citrus Pasta Salad.  

Tall One brought a batch down the shore to share with her friends and decided it was worth posting when everyone asked for the recipe!  Normally we don't like to re-post recipes that we haven't created on our own, or at least tweaked a bit, but this one is already perfect.  It comes from Giada De Laurentiis' cookbook "Giada's Kitchen: New Italian Favorites" and we literally cannot think of a single thing to change.  It is packed with fresh ingredients and tastes like summer.  Bring this to your next picnic and we promise that everyone will be begging for the recipe!

Tall One and her girlfriends enjoying the summer sun in Sea Isle :)

INGREDIENTS:
-1/2 cup olive oil
-1 orange
-1 grapefruit
-8 cups of chicken or veggie stock
-1 pound orzo
-1 small red onion, very thinly sliced
-1/2 cup chopped fresh mint leaves
-1/2 cup chopped fresh basil leaves
-1/2 Tbs fennel seeds, lightly toasted
-1 tsp coarse salt
-1/2 tsp black pepper


Boil the 8 cups of broth and cook the orzo according to package instructions.  When done, drain the pasta and the spread it out in an even layer on a large pan to cool.

While the pasta is cooling, pour the 1/2 cup of olive oil into a small bowl.  Zest in one orange and then set the orange aside.  Whisk together the oil and zest and also set aside.

Over a large bowl, section the orange and the grapefruit.  Be careful to discard all of the peel and the pith (the white part) and as much of the membrane (the thin clear part) as you can.  Squeeze the remainder of the fruit juice into the bowl with the citrus sections.  To the bowl add the sliced onion, the chopped mint and basil, and the toasted fennel seeds.  To toast the seeds simply toss them in a small nonstick pan over medium heat for about five minutes, giving the pan a shake every minute.  You'll know they are done when they start to become very fragrant.

Once the pasta has cooled most of the way, add it to the bowl with the fruit and herbs.  Mix gently until evenly distributed.  Finally add the salt, pepper, and reserved orange oil to the salad and toss together before serving.


This is the perfect summer salad in absolutely every way!

XOXO,
Talll and Small


Monday, June 11, 2012

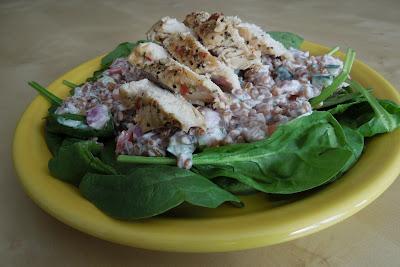
Greek Wheat Berry Salad


Wheat berries?  What the heck are wheat berries, anyway?  They are actually a pretty new culinary discovery to The Spatularettes, but ever since we first tried them, we couldn't get enough.  A wheat berry is actually the whole wheat kernel, minus the hull (thanks, Wikipedia!) and are used to make whole wheat flour.  They are chewy, hearty, and filling... and low cal too!  Wheat berries make a great base for any salad because their earthy taste pairs well with just about any flavor combination.  One of our favorites is Mediterranean flavors, so we dreamed up this Greek Wheat Berry Salad to take to work for lunch all week.  It is super filling and flavorful, so you won't be hit with those 3PM snack cravings that usually accompany a light lunch.


INGREDIENTS:
-1 cup dry wheat berries
-1 6 oz cup fat free plain Greek yogurt
-1 Tbs lemon juice
-1 Tbs fresh dill, minced
-1/2 cup diced cucumber
-1/2 cup diced tomato
-1/4 minced red onion

Optional:
-Spinach
-Feta Cheese
-Chicken


Cook the wheat berries according to package instructions.  It takes about an hour on the stove top, so plan ahead.  While the wheat berries are cooking, mix together the yogurt, lemon juice (about 1/2 a lemon), and minced dill.  Once the wheat berries are tender, but still chewy, drain them and allow to cool for about 10 minutes.  While the wheat berries are still warm, add them to the yogurt sauce and toss until they are well coated.  By adding the sauce to the wheat berries while they are still warm, it helps them to really soak up the flavor.  Allow the salad to cool in the refrigerator for at least an hour.  Just before serving add the diced cucumber, tomato, and red onion to the salad and mix gently until well combined.

We like to serve these Greek Wheat Berries over a bed of baby spinach and top them with sliced chicken or feta cheese.  They are completely flavorful and wonderful by themselves though!


This recipe makes 3 pretty large lunch portions, which even when topped with chicken, ring in at under 400 calories--so no guilt involved!

XOXO,
Tall and Small


Sunday, June 10, 2012

Iced Irish Coffee


This recipe is almost too simple to post, but is a great addition to any brunch!  Just a couple of ingredients are needed, so mix them together and you are ready to go.  Normally we would recommend using an Irish whiskey like Jameson, but Jim Beam is what we had on hand so we used it, and it turned out fine!  This recipe will make about 2 quarts.

INGREDIENTS:
-1 large pot of brewed coffee
-1 cup of Bailey's Irish Cream
-1/2 cup of whiskey
-ice

Brew 1 large pot of coffee.  We only have a 5 cup pot, so we actually brewed 2 1/2 small pots.  Allow the coffee to chill in the refrigerator for a couple of hours or over night.  Stir Bailey's and whiskey into the coffee and mix well.  Serve over ice.


There is nothing better than adding a little kick to your morning coffee :)

XOXO,
Tall and Small

Saturday, June 9, 2012

Monkey Bread


How bout we all say a big thanks to Tall Mom for sharing yet another great morning treat with us!  Back when Small and Tall used to run college cross country together, all of our teammates would look forward to the days that Tall Mom came to spectate.  First, because Tall Mom is the best cheerer that you've ever met.  Seriously, she is amazing!  Second, because she would bring us Swedish Fish to snack on as soon as we finished.  (We're not sure how that tradition started, but we loved it!)  And finally, because she would always bake a batch (or 2) of Monkey Bread for the team to share on the bus ride home.  And let us tell you, a bunch of cross country runners can make a loaf of Monkey Bread disappear faster than an Olympic hopeful and run the mile!

INGREDIENTS:
-2 loaves of frozen bread dough
-1 stick of butter, melted
-1 cup white sugar
-1/2 cup brown
-2 tsp cinnamon


Remove the loaves of bread from the freezer.  Allow them to thaw for a couple of hours, but don't let them rise.

In a small bowl in the microwave, melt one stick of butter, and while it is melting use the wrapper to grease the inside of an angel food cake pan.  Mix the 2 sugars and the cinnamon together in a medium bowl.  We like to set up a bit of an assembly line on the counter, starting with the bread dough, followed by butter, the sugars, and finally the cake pan.

Pull off pieces of the bread dough and roll them into balls, slightly smaller than a ping pong ball.  Dip the dough into the butter, then into the cinnamon sugar, and finally drop it into the angel food cake pan.  Do this with all of the dough.  It should fill the cake pan about half way.  Cover the pan and allow it to rise for an hour or two.
Once the dough has risen, preheat the oven to 350 degrees and bake the Monkey Bread for 30 minutes.  We suggest placing the cake pan on a baking sheet with shallow sides, because some of the topping tends to leak while baking.  The last thing you want while preparing for brunch is a smoky oven!  Once the bread has finished baking, remove it from the oven and immediately invert the pan onto a serving plate.  The monkey bread should slide right out.  Just be careful because the bread and the pan will still be super hot!


Hungry runners and party-goers alike will agree... Monkey Bread is the best!

XOXO,
Tall and Small